


Just months before the end of the Great War, Australians led an allied offensive against a resurgent Germany following the collapse of the Eastern Front. This battle was unlike any other, for the first time in the history of warfare we saw the first use of combined arms and Australians commanding British and American soldiers to victory.
Lasting just 93 minutes, three minutes longer than legendary Australian general (and commanding officer) Lieutenant General Sir John Monash's proposed battle timeline, the Battle of Hamel was a transformative experience for Australia, its military and its future relationships with the world's great powers.
From the onset the situation on the Western Front was dire, the Eastern Front had collapsed as Russia descended into a brutal civil war and a resurgent German Army was bolstered by 48 German divisions launching a massive Spring Offensive against the British southern flank in early March of 1918. While the German offensive exhausted itself against the reinforced allied lines, supported by recently arrived American troops the spectre of stalemate settled in once again.
However, the Spring Offensive had achieved some objectives, namely it had created a large bulge in the front line around the village of Le Hamel, Somme, which exposed Allied troops in the sector to German artillery bombardment and enabled the Germans to observe Allied rear areas. In response to the precarious strategic situation, Sir John Monash, Commander of the Australian Corps, was chosen to plan the Allied counter-attack.
Allied victory was far from certain; the geography was firmly favouring the defending Germans who had a penchant for digging themselves in and had leveraged the strategic advantages of the surrounding area. In response it was Monash's dedication, meticulous planning and commitment to the soldiers under his command that provided the Allies with the opportunity to retake Hamel and eventually Villers-Bretonneux.
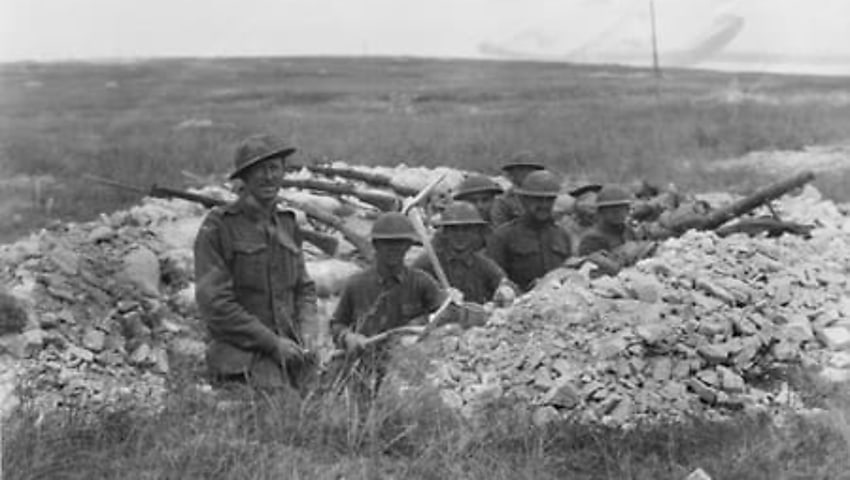
To achieve the objectives, the Allies made use of a number of different tactics, trying to avoid the human wave tactics responsible for the carnage of the early days of the war. This saw the first use of combined arms tactics, which included parachute drops of medical supplies and rifle ammunition in cases, and resupply by tanks increasing the pace of the allied offensive, which had previously been limited by man and horse power to keep pace with the battle.
It is estimated that the carrying power of the tanks was equivalent to about 1,200 troops doing the same job. Signals were sent largely by cable and telephone, while more novel methods were used with limited success, for the first time, wireless radios were used by officers to send updates and messages from captured mission objectives.
By far the most important component of the combined arms operation that characterised the battle was the advanced co-ordination and co-operation exhibited between infantry, artillery and armour in the form of Mark V tanks, which provided cover and support for the advancing infantry. The artillery barrage began creeping toward the German lines, covering the advance of Allied troops and highlighting Monash's commitment to the safety of the soldiers under his command.
Despite a late withdrawal of a large proportion of American forces at the behest of American General John Pershing, which significantly impacted the size of the Allies attacking force, the Allies moved forward with the plan, beginning with the initial bombardment at 22:30 the night of the 3 July, which helped to cover the advance of Allied tanks to their assembly points.
As the artillery barrage shifted from it's initial harassing bombardment to the creeping bombardment that would cover infantry and armour movements as they approached the German lines, this phase of the battle saw overly eager American troops attempt to keep up with the experienced Australians, resulting in a number of blue-on-blue casualties.
Despite this, the offensive continued at increasing pace with key objectives at the Pear Trench, Vaire and Hamel Woods, which played host to a heavily defended German fortification providing over watch of the Australian advance to the west and saw an aggressive advance by infantry with the support of British tanks. As the Allies reached Hamel village, the slow movement of the armour meant that infantry had to proceed without the support of armour, raising the number of casualties.
Again, the planning meant that the Allies captured Hamel village, with the Allies including the Americans making use of armour to flush out recalcitrant Germans who remained entrenched in what few structures remained of the town. Turning to the southern flank, the Australian units saw heavy losses to the German machine guns. Inflicting heavy losses saw the Germans mount a violent counter attack, which in turn saw the Allies call for artillery and armour support resulting in a major armour advance into the German lines and a salient formed by armour who pressed the advantage to harass the rear of the German lines.
The key to ensuring the success of all of the other major offensives as part of the battle was the feint attack at Ville-sur-Ancre, with Australians again leading the fight against entrenched German lines in an attempt to draw German resources toward the area to ease the attack at Hamel. This slight of hand was instrumental and was part of the 'smoke and mirrors' employed by Australians to limit German strength elsewhere.
While initially intended as a diversionary tactic, Ville-sur-Ancre saw mounting Australian casualties as the attack was stalled by wire obstacles and heavy machine gun fire. Despite this, the Australians established a line at the village and held firm in the face of mounting German counter offensives. As the lines stabilised and mopping up operations were finalised, resupply operations were conducted by four carrier tanks and No. 9 Squadron of the RAF provided parachute aided resupply, which had been developed by an Australian led team, while other RAF units conducted clandestine aerial bombardment of German rear areas.
As aerial battles between the RAF and German Air Force broke out overhead and the German's planned their counter attack – which was precipitated with a gas attack and the feared storm troops leading the charge to breach the Allied line, placing the Allies gains in danger – the Allies began to rally. With an increasing number of Americans, the Allies were able to turn the tide and counter the German advance, holding the line.
While relatively small in comparison to previous battles of the war, Hamel would have far-reaching consequences for warfare, particularly trench warfare, which had defined much of the First World War. Like the Battle of Cambrai in 1917, Hamel provided a major example of the capability to successfully implement combined arms in offensive operations.
The use of artillery, armour, infantry and to a limited extent air support as the future of warfare. The pace of the battle and the way in which different elements collaborated effectively would inspire the development of both doctrine and technology over the following decades resulting in the German Blitzkrieg, which would dominate the European battlefield 21 years later and would continue to evolve into the high-tempo manoeuver warfare in the 21st century.
For Australia, Hamel came as the culmination of four years of sacrifice from the shores of Gallipoli to the fields of Flanders. While the willingness of Australians to fight, an irreverent disregard for authority and a stubborn refusal to accept no-win scenarios was well documented throughout the war, Hamel changed the narrative, it established the idea of Australia as an innovative military leader and entrenched the myth of Australia as a reliable steadfast ally.
The battle also served to raise the profile of commanding officer Monash, who would later be described by legendary WWII commander, Field Marshal Bernard 'Monty' Montgomery, as the best WWI general on the Western Front in Europe, while the strategy implemented by Monash would go on to be used successfully again on a much larger scale in the Battle of Amiens and would prove to be a major factor in the later successes of the Allies.
Hamel also marked one of the first instances in which Australian and American forces would fight side-by-side, but, as history has now shown, the relationships and bond between warriors forged on the battlefields of Europe would be put to the test in the Pacific, mountains of Korea and jungles of Vietnam, and again in Afghanistan and Iraq as Australian, British and American service men and women would continue the spirit into the 21st century.
The Defence Connect Podcast with author Peter FitzSimons to discuss the Battle of Hamel and it's place in Australia's wartime story is available here.

Stephen Kuper
Steve has an extensive career across government, defence industry and advocacy, having previously worked for cabinet ministers at both Federal and State levels.
Want to see more stories from trusted news sources?
Make Defence Connect a preferred news source on Google.
Click here to add Defence Connect as a preferred news source.
